 This article is meant to explain simply, and step by step, how to create a light installation of ubuntu 12.04LTS.
Unity, Gnome, KDE are very heavy. It cannot run there, on my DELL Optiplex GX280 2Gb RAM.
This is quite a challenge to have a modern environment on such an old comp (at least 6-8 years).
I also want to use this article as an introduction to the installation of custom E-UAE running amiga OS AND/OR AROS linux hosted.
Targeted system :
– Ubuntu 12.04 server LTS 32bits/64bits
– use of tint2 and openbox
This is MY way, but this should be usefull for everyone.
Download Ubuntu Server 12.04 LTS 32 or 64 bits :
Do it there :
http://www.ubuntu.com/download/server
Burn the iso :
(or make a bootable usb with the iso using
http://www.ubuntu.com/download/desktop/create-a-usb-stick-on-windows)
boot your comp’
using the media you created in 2
during the installation,
do not choose any package to install
reboot
and log on for the first time with the user you created during the install process. For the moment, there is no need for an X server, so you just have a black screen with a prompt, and it is just enough to begin !
These are the packages i installed :
Using the command
sudo apt-get install [package-name]
– ubuntu-desktop : because i’m lazy. this is a huge package. it installs unity and all the dependences. we won’t use it, but it uses to install a lot of packages for usb volumes handling, alsa, XServer, udevd… and many stuffs that are needed in modern OSes.
– openbox : the windows manager we will use
– nitrogen : openbox is a fucking light and efficient windows manager, but it is… blanck. this package allow a wallpaper [correction : I don’t use it anymore, see below, paragraph 9c]
– tint2 : we also need a taskbar, there it is
– conky : show ressources informations on the background
– firefox : the only really open-source web browser
– ia32-libs : 32bits compatibility layer. Only available/usefull if you decided to install 64bits version of ubuntu
– ubuntu-restricted-extras (flash 11) : many packages are installed there. This is most for flash plugin. [correction : this package can get you in some issues, i personally decided not to install it, it’s up to you]
– vlc : the video best player ever !
–leafpad : a cool gedit replacement
–pcmanfm : a cool filebrowser
–obmenu : graphical interface for openbox menu editing
–imagemagick : to take screenshots
–usbmount : for usb automounting [correction : i don’t use it anymore, see below, paragraph 9c]
–volti : a simple volume level manager for tint2
This drives us this command line :
sudo apt-get install ubuntu-desktop openbox tint2 pcmanfm vlc volti leafpad firefox thunderbird playonlinux wine nitrogen obmenu usbmount
Don’t forget to update / upgrade :
Using :
sudo apt-get update

sudo apt-get upgrade
make the sound (alsa) work :
So, we are on ubuntu server. At least, we now have a light and efficient core. But, everything has still to be done to “pimp” your configuration.
This is something I really love, since I am on Amiga (like) systems for ages.
to make the sound work, it is simple, you have to add yourself in the “audio” group, and initialise ALSA.
to do so :
sudo adduser $USER audio

sudo alsa force-reload

sudo alsactl -F init
That’s all. You can try your sound using vlc for example.
Normally, alsa should have recognized your audio card. If you have any problem, I suggest you to read this article :
https://help.ubuntu.com/community/SoundTroubleshootingProcedure
pimp my desktop :
Here are some tricks to configure your desktop and make it simple and efficient.
So, we have : openbox, tint2, nitrogen and conky installed, we’ll make them work together.
First, login into openbox session from the login screen. You’ll get a blanck screen. [Right Click] and open a terminal.
nano ~/.config/openbox/autostart
this is the autostart list of programs to load at the beginning of the session. so type that, in any order, at the end of the file :
nitrogen --restore &

conky&

tint2&

volti&
To save your file, use [ctrl+x], then “Y” (for “yes”, french users will type “O”), then [enter].
Get out of the session, and re-enter it. You should now have a taskbar on the bottom, and something on your background that give you infos on the used resources.
You can change the background now, using
nitrogen ~/Images
You should ofcourse have put some images inside your Images drawer.
Get out and get back in your session and look at the result.
“Why is there no icons inside the pcmanfm window ?“
Add the line
gnome-settings-daemon &
in the autostart file.
An other way…
… of having a background image and to have a real desktop / peripheral automount.
I used to use nitrogen to show a background image, and when I plug an usb peripheral, or put a cd in the driver, I used to open a pcmanfm window to get them automounted (usbmount also do the job well),or even use the “mount” command, which is nice to learn, but not very convenient when you are unsure of the filesystem you want to mount. The usbmount package use to create directories inside “/media/”, that I don’t feel very pretty.
So, there is a way to have a real modern, but light desktop manager. Instead of using usbmount and nitrogen, I now prefer to launch pcmanfm with the “–desktop” option.
You just have to delete the lines regarding to nitrogen and uninstall usbmount (if previously installed).
sudo apt-get remove usbmount
And add :
pcmanfm --desktop &
to the autostart file.
The autostart file :
With the last updates of this article, your autostart file should look like that :
conky&

tint2&

gnome-settings-daemon &

volti&

pcmanfm --desktop &
To change preferences of your desktop, you now have to launch pcmanfm from terminal like this :
pcmanfm --desktop-pref
This allows you to change the background, and some other prefs.
openbox menu editing :
There are 2 ways to do that :
– using obmenu app
-manually edit “~/.config/openbox/menu.xml” config file
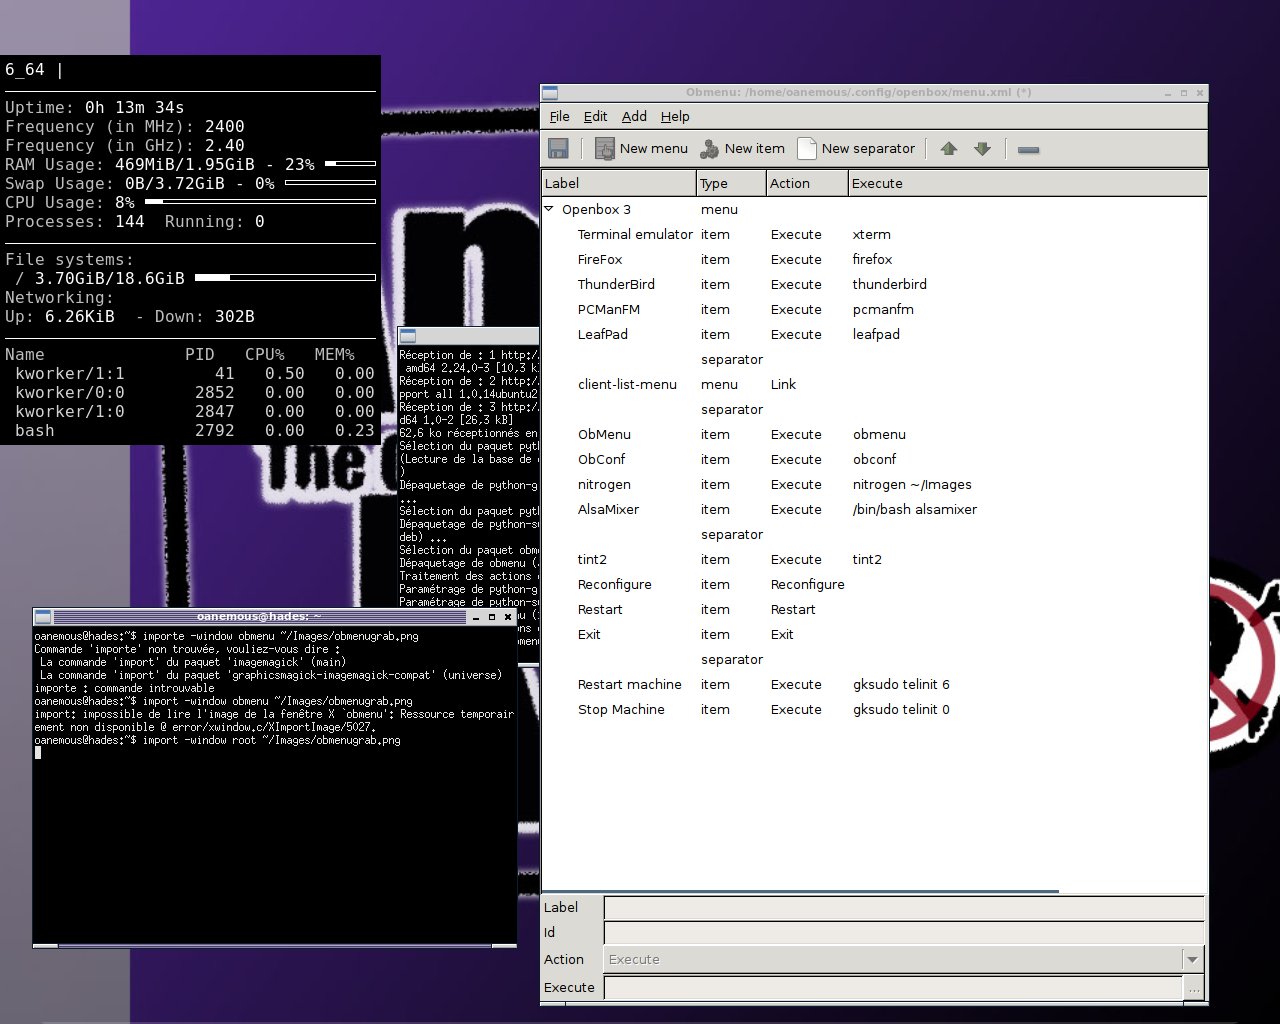
To use obmenu app, use the command :
obmenu
inside a terminal. Here is a screenshot :
Edit the “menu.xml” config file is simple. You just have to respect the xml format.
Automate the menu content :
You must install:
sudo apt-get install menu menu-xdg gnome-menus
when done, open your menu.xml (like in the last paragraph), and add those 2 lines :
<menu execute="obm-xdg" id="xdg-menu" label="xdg" /> <!-- at the begining of the file (2nd line) -->
and:
<separator />

<menu id="xdg-menu" /> <!-- where you want the menu to appear-->

<separator />
do not type your root password…
…for closing the session or stop the machine.
You can use your openbox like this, but, it is annoying to type your password each time you want to close your session or stop your machine.
This is simple, use visudo to edit /etc/sudoers and add one line at the end of the file. Be carefull, but don’t worry. psexec can help you if you get stuck.
so, type this :
sudo visudo
then type your root password
then add this at the end of the file :
[yourusername] ALL= NOPASSWD: /sbin/telinit
if you get stuck, try to use “psexec visudo” to open the file again and fix the problem.
tint2 simple config editing :
This can easily be done editing the file “~/.config/tint2/tint2rc“.
I personnally wished to have some “docking” launch icons for the programs I use the most : thunderbird, firefox, xterm, leafpad and pcmanfm.
The icons are stored there :
/usr/share/icons
Each drawer is a complete set.
The description of the “dock” can be found there :
/usr/share/applications
For each .desktop textfile, there is a possible menu for tint2.
Here are the lines you have to modify inside your tint2rc file :
panel_items = LTSBC

autohide = 1

#——————————————

#LAUNCHER

#——————————————

launcher_icon_theme = gnome

launcher_padding = 2 2

launcher_background_id = 1

launcher_icon_size = 20

launcher_item_app = /usr/share/applications/firefox.desktop

launcher_item_app = /usr/share/applications/debian-xterm.desktop

launcher_item_app = /usr/share/applications/thunderbird.desktop

launcher_item_app = /usr/share/applications/leafpad.desktop

launcher_item_app = /usr/share/applications/pcmanfm.desktop
Usefull ressources :
There are my configuration files for tint2 and openbox :
-tint2 config : tint2.rc
-openbox startup : autostart
-openbox menu : menu.xml
If you want more informations about nitrogen, conky or tint2, please, have a look there :
– about tint2 : http://code.google.com/p/tint2/wiki/Install
– about conky : https://help.ubuntu.com/community/SettingUpConky
– about nitrogen :…
– There is there an other way to replace unity with openbox (straight to the end : install LUbuntu) : http://www.reddit.com/r/Ubuntu/comments/vh4yd/replacing_unity_with_openbox/
– About Openbox (in french) : http://doc.ubuntu-fr.org/openbox


6 Replies